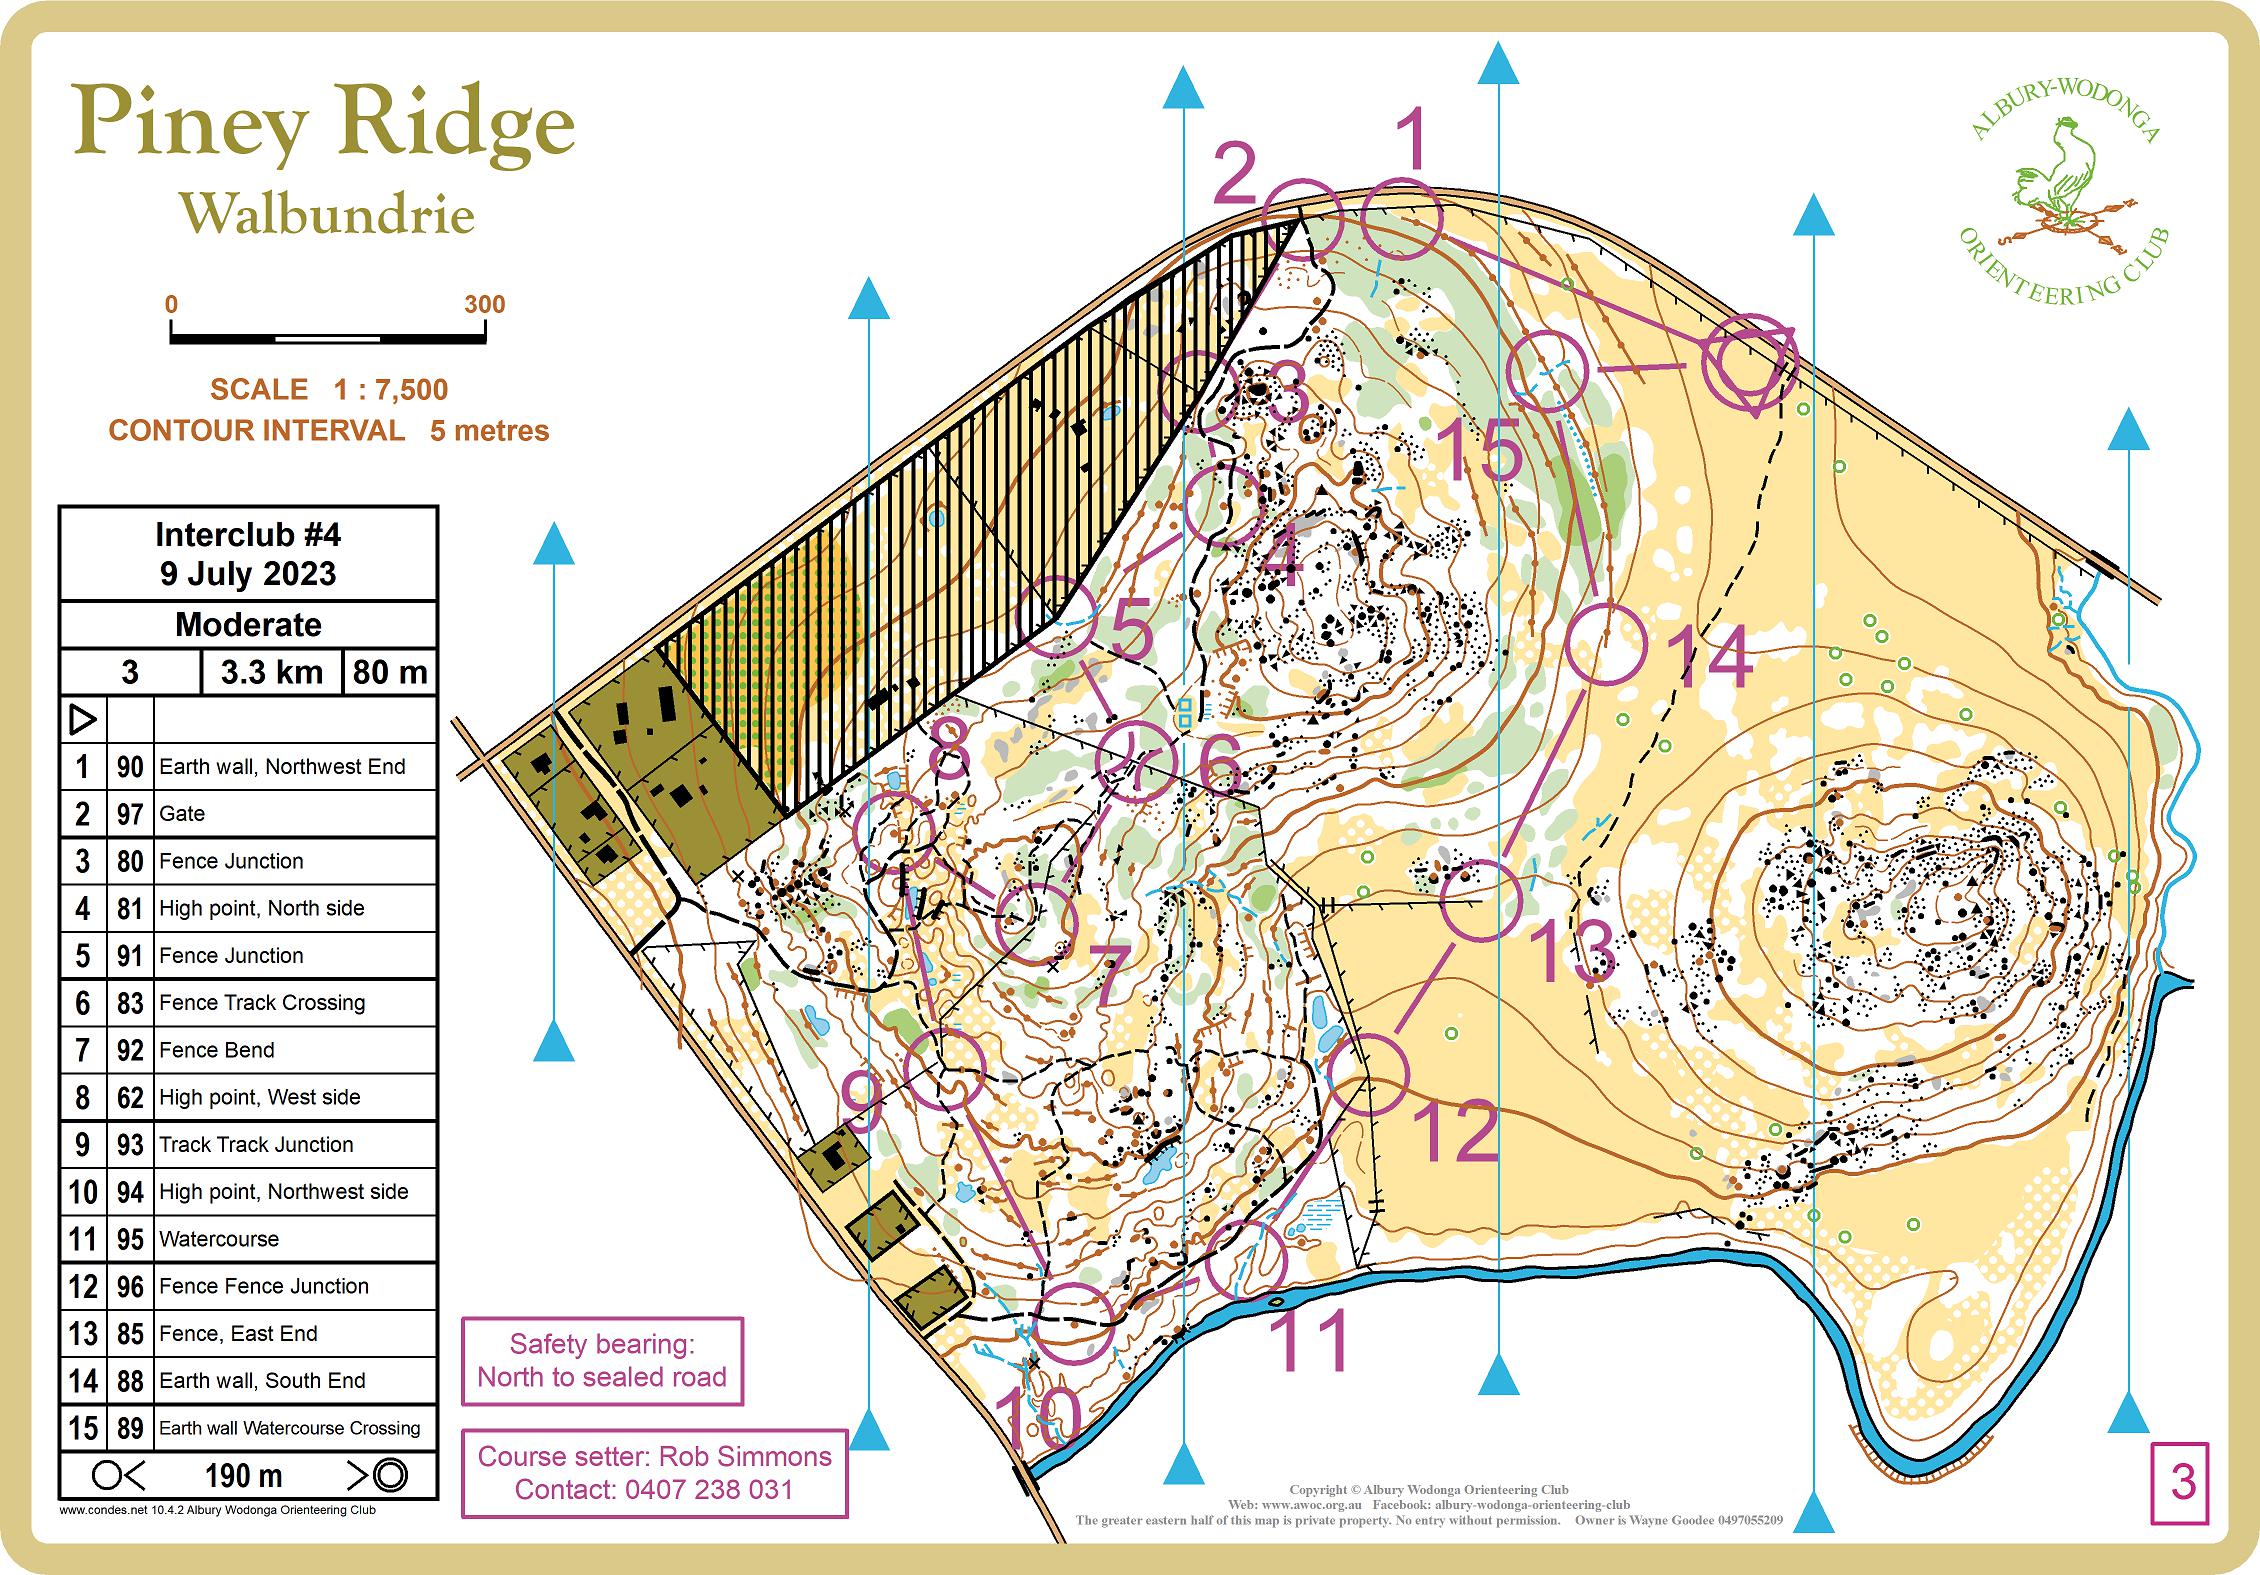
Following is a briefing for how to attack the Moderate course from Interclub #4 at Walbundrie on 9 July 2023.
Overall, the course was at the easier end of the Moderate scale but with route choice and care needed on some legs. And the easier legs are always good for practicing technique – those things you should be doing on harder legs but that are too overwhelming to practice on those harder legs.
Compare the notes below to how you’d run the course, or how you did run the course if you’ve already done so. Everyone sees things differently and a well-designed course will encourage different choices – the notes below are intended to give you things to consider and compare to.
The CARE technique is used to describe each leg:
- C
- Control
- Control circle
- Collecting feature
- Catching feature
- A
- Attack point
- R
- Route
- E
- Exit
This technique and terms like ‘collecting feature’, ‘catching feature’ and ‘attack point’ are discussed in other articles.
Analysis
| S-1 | C | 90 : earth wall, NW end Control circle: Not control very close to fence and on boundary of open (yellow) and densish forest (light green) |
| A | Convergence of earth wall, fence and forest | |
| R | Either along or parallel to fence until attack point Track (thumb) distance travelled using obvious features: the prominent large tree (green circle with white border) in open area, right on the leg line, should be visible from long range is about halfway to control. Note there are two other earth walls near the prominent large tree but they are in open land; the earth wall with the control is located on the edge of a forested/treed area. | |
| E | Ensure heading up gentle slope, heading WNW parallel to fence | |
| 1-2 | C | 97 : fence-track crossing |
| A | Not required (the control itself is obvious) | |
| R | Fenceline | |
| E | W along fence | |
| 2-3 | C | 80 : fence-fence junction Catching feature: Track bend just after the control (S edge of control circle) – if you get to that bend you’ve gone too far! |
| A | Not required (the control itself is obvious) | |
| R | Fenceline as long as not too rough, otherwise longer route on vehicle track If using vehicle track, be sure to carefully watch for control after the track returns close to the fenceline | |
| E | S on vehicle track | |
| 3-4 | C | 81 : small knoll (high point) Catching feature: Track bend just S of control location – if you start turning back to the W you’ve gone past the control |
| A | Control feature should be easily visible from track but note small patch of open ground (yellow) on opposite side of track – the control is next to the start of open ground | |
| R | Track (possibly cutting corners but minimal time saving given short distance) Keep track (no pun intended) of direction changes so you always know where you are along the vehicle track | |
| E | Up to track from fence then S and E along track | |
| 4-5 | C | 91 : fence-fence junction Control circle: Minor watercourse – control next to watercourse-fence crossing point |
| A | Control itself or watercourse depending on route choice | |
| R | Either:
| |
| E | Downhill (west), possibly avoiding the green by heading S on the track from control 4 and veering off at the second bend (on the edge of the control 4 circle) | |
| 5-6 | C | 83 : path-fence crossing |
| A | Not required (the control itself is obvious) | |
| R | Three choices:
Option 2 is the safest but slowest. It would be best to head in a more southerly direction of control 5 until you intersect the fence and then up the hill to the control – this cuts the corner and saves time. Option 3 is the shortest and fastest and fairly safe as the fence that the control is located on is a catching feature – you can’t go over it by mistake. | |
| E | Either SW along fence or E uphill, looking for path and open area | |
| 6-7 | C | 92 : fence bend Control circle: Note path right next to control, also hilltop next to control |
| A | Not required (the control itself is obvious) | |
| R | Cross fence then S along path/fenceline, either:
| |
| E | Over fence then SW on path | |
| 7-8 | C | 62 : small knoll (high point) Control circle: Control at small knoll on top of earth bank. Catching feature: Fence to NW |
| A | Track-path junction just S of control (in control circle, just 15 m from control) | |
| R | W along path, crossing flatish hilltop then path branch to N just before hill starts decending more steeply (note path junction is where the contours become more closely spaced). Follow path down slope to track junction then turn W for a short distance to attack point at junction next to control. Estimating distances will help avoid over-shooting a junction. | |
| E | W along path (not north!) | |
| 8-9 | C | 93 : path-fence crossing |
| A | Not required (the control itself is obvious) | |
| R | Vehicle track to S and then onto path heading SE to control, being careful to take take the correct turn at each junction. | |
| E | Out to junction and then SW on track. | |
| 9-10 | C | 94 : small knowll (high point) Control circle: Control next to vehicle track |
| A | Not really required as feature next to track. But note track-path junction on W edge of control circle – only 35 m to control from this junction. | |
| R | Choice:
| |
| E | Downhill on either the path or a direct line, depending on route choice. | |
| 10-11 | C | 95 : minor watercourse Control is in a distinct gully |
| A | Track bend within the control circle. Or use the small cliff (rock face) on the north side of the track (printed over the north line before the control circle). | |
| R | Along vehicle track to either attack point then veer east (down, across the slope) into the gully. | |
| E | E along vehicle track | |
| 11-12 | C | 96 : fence junction |
| A | Track bend and fence corner next to each other, before the control circle | |
| R | Up gully to track or fence, continue to attack point (fence bend) then along fence to control | |
| E | Up gully | |
| 12-13 | C | 85 : fence, E end |
| A | Not required (the control itself is obvious) | |
| R | Cross fence. Easy/safe option is N along fence to junction with crossing point, turn E along fence to control. Shorter/faster route is direct: note contour halfway along leg line indicates a gully and looking between controls 13 and 14 there is a saddle. So the route is simply up the left/west side of the gully towards the saddle, noting a prominent large tree on your right/east part way along (don’t get too close to the tree, otherwise you’re too far in the gully!) Keep eyes up as control is likely visible from a long distance | |
| E | Cross fence then NE up side of gully | |
| 13-14 | C | 88 : earth wall, S end |
| A | Pair of prominent large trees in saddle | |
| R | Through the large, broad saddle using either the indisinct path or keeping a bit to the left/west of the saddle. Aim for the western (left-hand as you approach) prominent large tree then veer a bit to the left/north to control, only 50-60 m ahead. | |
| E | Up slope towards saddle | |
| 14-15 | C | 89 : earth wall-minor watercourse crossing |
| A | Not required (the control itself is obvious) | |
| R | Along earthwall | |
| E | N along earthwall | |
| 15-F | C | F : open area at assembly point |
| A | Not required (the control itself is obvious) | |
| R | Downhill along watercourse to get to open area then direct to finish which should be visible | |
| E | Downhill along watercouse |